How to upload a podcast to Apple Podcasts in 2024
Transistor Team
Every podcast you create should be submitted to the Apple Podcasts directory. Unlike other platforms (like Spotify and Google Podcasts), Apple still requires you to submit your podcast feed manually. You must access Podcast Connect and submit your podcast's RSS feed there.
Here are the steps for submitting your podcast to Apple Podcasts:
Create an account on Apple Podcast Connect – this is Apple's dashboard for podcasters; you'll submit your RSS feed here.
Sign up for podcast hosting – you'll need a place to host your audio files and RSS feed.
Publish at least one episode – preferably a podcast trailer!
Fix common RSS mistakes – make sure your podcast is configured properly
Add a new show in Apple Podcast Connect – once logged in to Podcasts Connect, click the purple "+" icon, and then select "New show."
Copy & paste your RSS feed URL – you'll paste it into Podcast Connect.
Wait for Apple to process your submission – it will take Apple Podcasts 5-10 minutes to process your details before you can submit it.
Submit your podcast to Apple for review – after clicking "Submit podcast for review," it can take up to 8 days for them to review it before they include you in their directory.
Promote your show – ask people to subscribe, listen, and review on Apple Podcasts.
For a more detailed guide on podcasting, read "How to start a podcast."
Video tutorial:
Step 1: Create an account on Apple Podcast Connect
This is Apple's dashboard for podcasters:
https://podcastsconnect.apple.com/
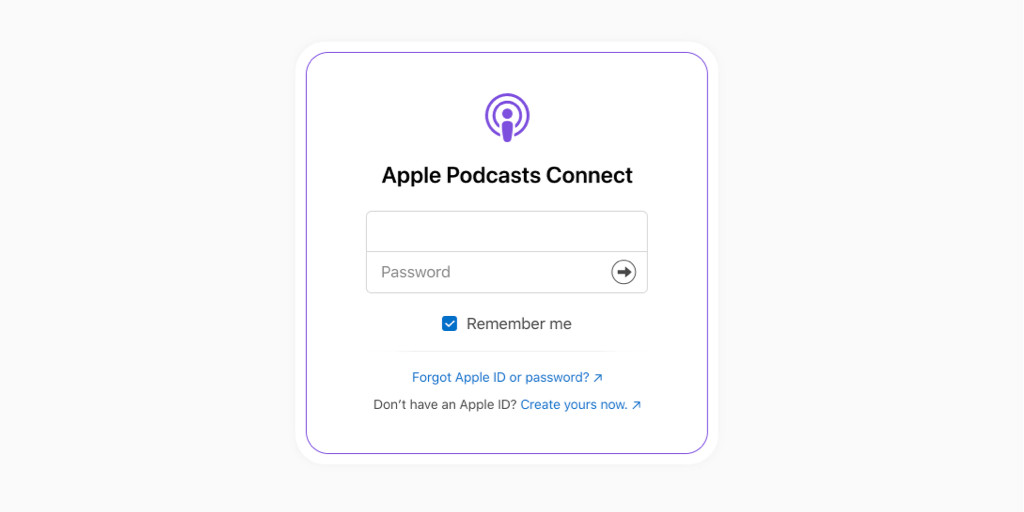
To use Apple's Podcast Connect, you'll need an Apple ID.
It's often better to create a new Apple ID that you'll use primarily for podcasting. This is especially important if you're creating a podcast for work. This is the account you'll be using to access Apple's podcast portal (Podcast Connect) and to see Apple's podcast analytics.
If you create a new Apple ID, make sure you verify it! You can do this by logging into the iTunes Store (on your phone or desktop) before you sign in to Podcasts Connect.
Step 2: Get a podcast hosting account
Podcast hosting is similar to website hosting. To host a website, you use a service like Wix, Squarespace, or WordPress to host your website files.
The same applies to podcasting: to submit a podcast to Apple Podcasts, you'll first need to purchase podcast hosting.
On a podcast host (like Transistor), you can upload your audio files. You'll also edit show details, add cover art, create episodes, and generate an RSS feed for your podcast. It's the RSS feed that you'll be submitting to Apple.
Step 3: Publish at least one episode
You'll need at least one episode recorded (and uploaded to your podcast host) before you submit it to the Apple Podcasts directory.
Here's a tutorial for recording, editing, and uploading podcast episodes:
Step 4: Check your show settings
You'll want to make sure your podcast is configured properly. Specifically:
Make sure you've chosen at least one category.
Make sure you've uploaded your show's artwork. Apple requires artwork and recommends an image of 3000x3000 pixels. However, the file size can't be larger than 512KB.
You'll also need at least one episode published for Apple to recognize your feed.
To validate your podcast feed, you use the Podbase feed validator.
Step 5: Add a new show to Apple Podcast Connect
Once logged in to Podcasts Connect, click the purple "+" icon and then select "New show."
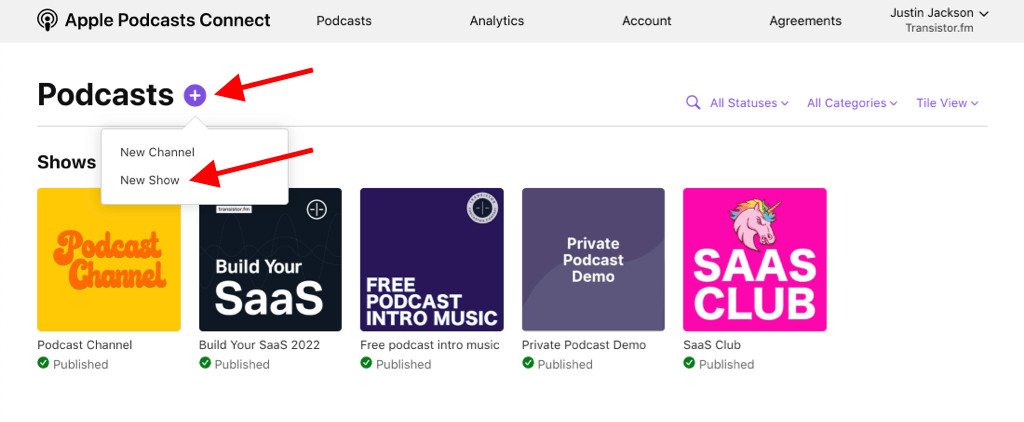
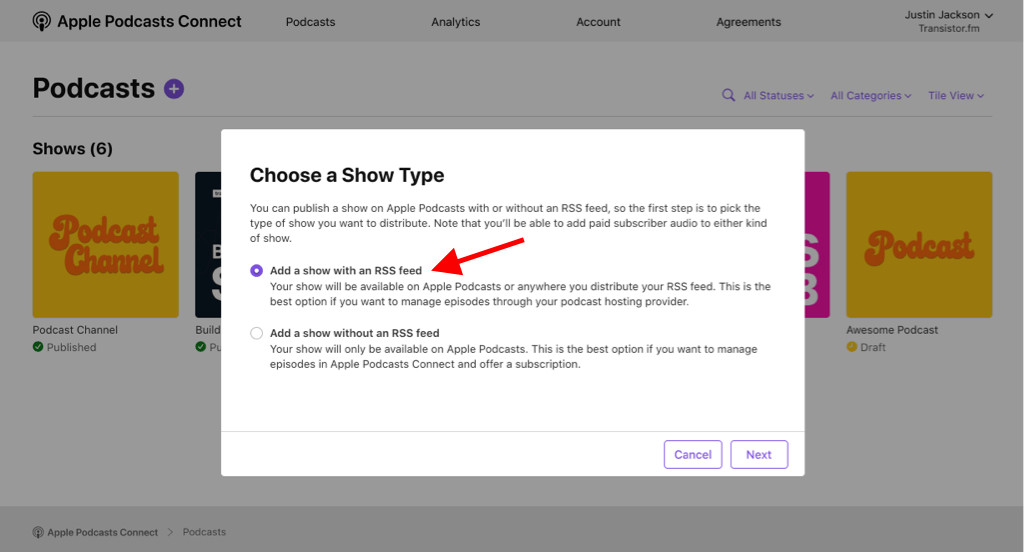
On the next screen in Podcast Connect, you'll choose "Add a show with an RSS feed."
Step 6: Copy & paste your RSS feed URL into Podcast Connect
Now, you must log into your podcast hosting account and get your RSS feed URL.
An RSS feed URL looks like this:
https://feeds.transistor.fm/your-show
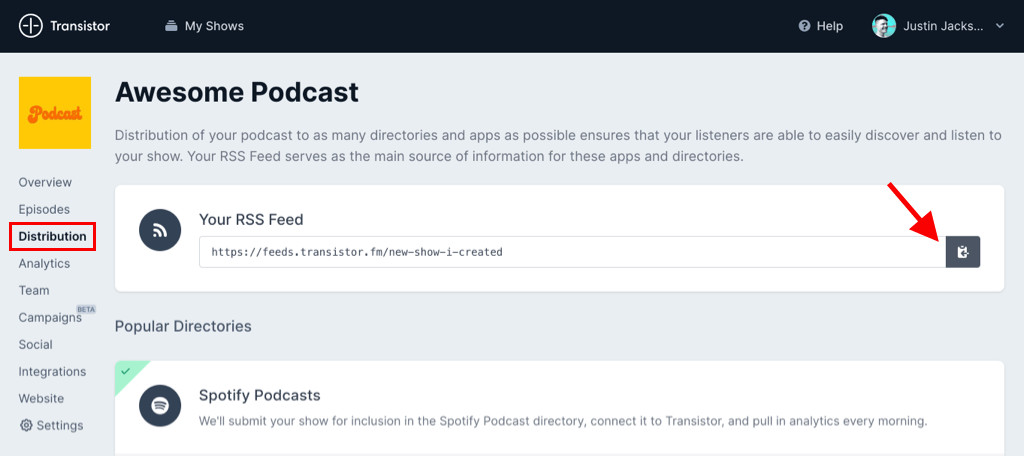
If you're using Transistor, you'll find it in the "Distribution" menu for your podcast:
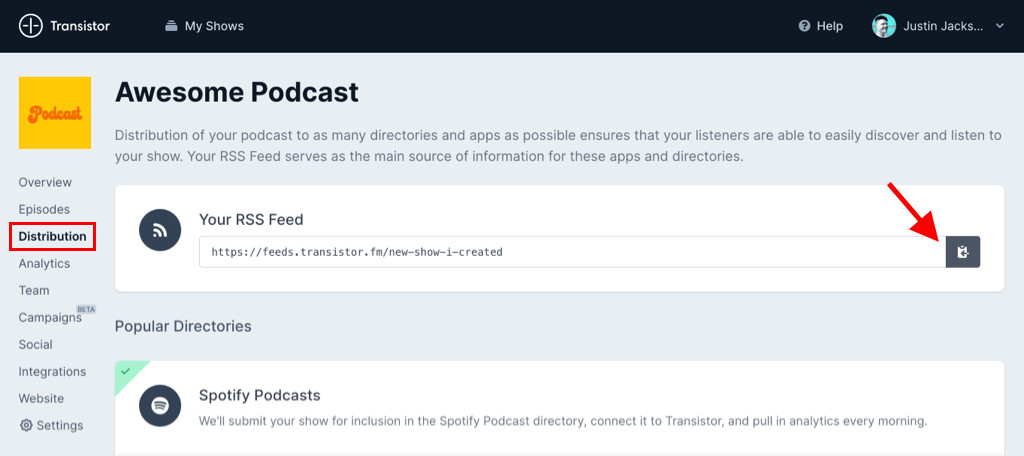
Click the copy button to copy the RSS feed URL into your clipboard
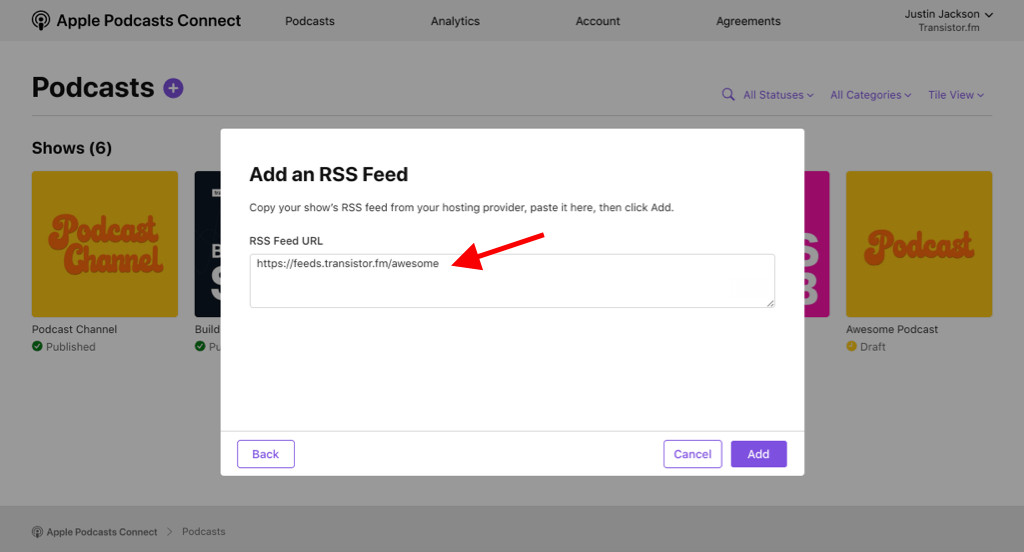
Now, go back to Apple's Podcast Connect, and paste in your RSS feed URL:
Step 7: Wait for Apple to process your show details
At this point, Apple will need to process your RSS feed before you can actually submit it. This usually takes 5-10 minutes.
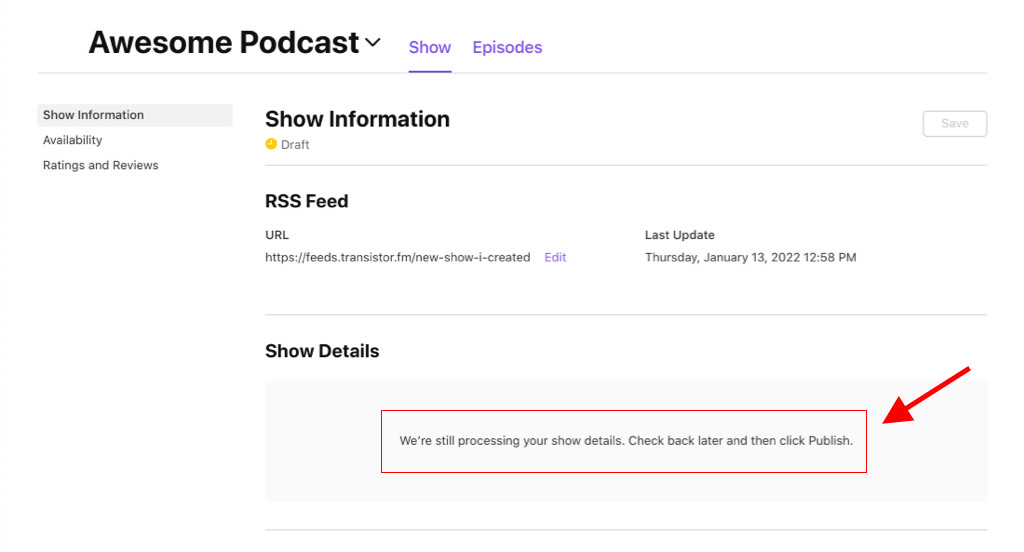
Refresh this page until it says that processing is complete.
Step 8: Submit your podcast to Apple for review
Once your show's details appear, you'll also see a new button: click "Submit podcast for review."
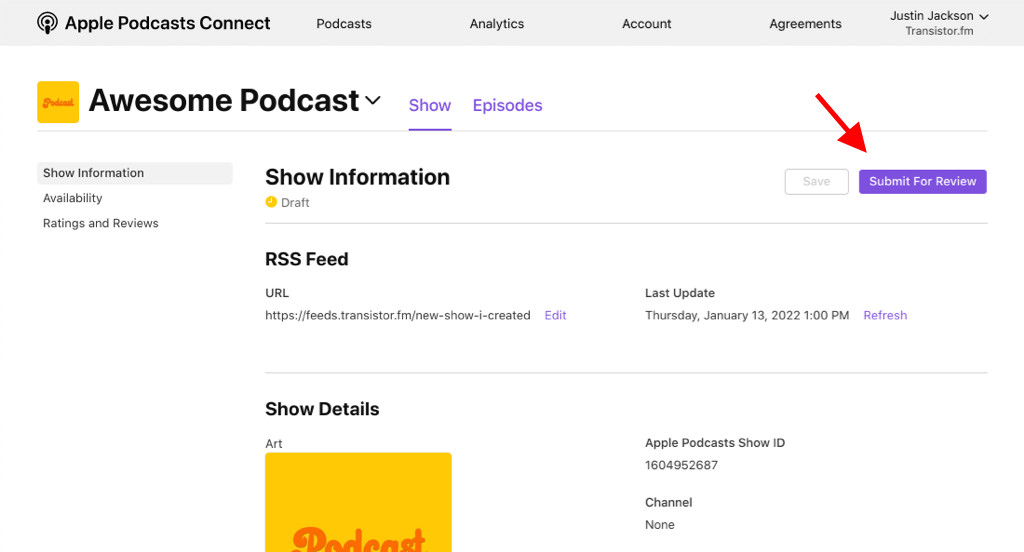
If everything looks correct, click "Submit for Review."
Apple manually reviews each podcast submission. In 2023, they've been processing new podcast submissions a lot faster. It can take 15 minutes or 24 hours for them to review your submission.
You only need to submit your RSS feed to Apple once! Once Apple has accepted you, your episodes will automatically appear in their directory whenever you publish new episodes.
Step 9: Start promoting your show!
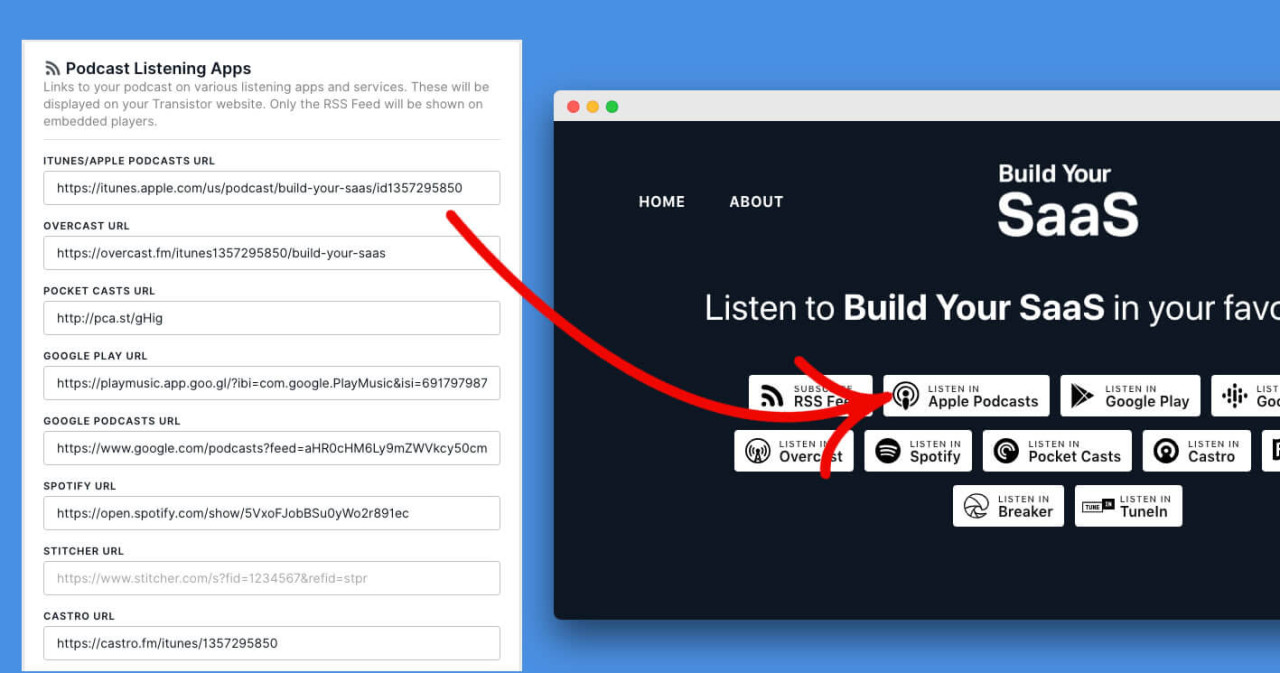
Once Apple approves your podcast, you can share the show with others and add an Apple Podcast badge on your website.
If you're using Transistor for your podcast website, we'll automatically add a "Listen on Apple Podcasts" button to your subscription page:
If you want more information about promoting your show, I've written a guide here.
Why should I submit my podcast to Apple?
Apple's podcast directory is important for three reasons:
It's featured prominently in the Apple Podcasts app and is shipped with every version of the iPhone (more than 1 billion iPhones are in use worldwide).
It's featured prominently in the desktop version of Apple Podcasts as well (not as important, but still significant).
Many podcast directories (Podchaser, Overcast, Pocket Casts, Breaker, Castro, Listen Notes ) use Apple's directory as their "master copy." If your show is on Apple Podcasts, it should automatically show up on most of the other directories. (You can still submit your show manually to other platforms. I explain how here).
Frequently Asked Questions
Frequently Asked Questions
You should base your podcast on a topic you're interested in and curious about! It could be a hobby you're passionate about (long-distance running, reviewing romance novels) or a business topic related to your career (marketing a main street business, public speaking at tech conferences). You can also think of terms people might be searching for, like 'best podcast for anxiety' or 'best podcast for camping'.
Get a USB microphone (the ATR2100 or the Samson Q2U are both good).
Connect your microphone to your computer, iPhone, Android, or tablet.
Record your audio. You can use free software like Garage Band (Mac) or Audacity (PC).
Export your recorded audio to MP3. For audio quality, choose 44100 Hz and 128 kb/s in your export settings.
Log in to your Transistor hosting account.
Upload the MP3 file you recorded, and then publish your episode.
Now, your hosting provider will generate an RSS feed for your podcast.
Submit your podcast's RSS feed to Spotify and Apple Podcasts.
Every time you publish a new episode, listeners will automatically get it in their podcast player!
For more information, please read our guide: How to start a podcast.
If you already have a PC or tablet, the only equipment you'll need is a USB microphone. The Samson Q2U is a good choice, and only costs $60. Recording and editing software can be free (GarageBand or Audacity). And podcast hosting, like Transistor, is affordable on a monthly basis. It's possible to start a podcast for under $100.
The Build your SaaS podcast, which has a tech audience, earns roughly:
$300/month on Patreon
$600/month from podcast sponsors
Total monthly revenue: $900 / month
Keep in mind, it can take years to build an audience big enough for monetization.
At Transistor, many of our users earn revenue for their podcasts by:
Getting listeners to support them on Patreon – Patreon is a 3rd-party platform that allows your listeners to support you monthly. Their website describes it best: "Fans pay you a subscription amount of their choice in exchange for exclusive content." (Example)
Creating a membership site – using tools like Podia, Memberful, or PodFan, you can create a private membership site for your listeners, and charge them a subscription.
Getting advertisers – some of our users also allow companies to sponsor their podcast.
Need help? Transistor customers get priority customer support. Sign up today, and we'll walk you through the whole process.
